Magnet Admin Bot
Instructions
Magnet Admin Bot
Magnet Admin Bot
Welcome to “Magnet Admin Bot”!
“Magnet Admin Bot: Smart management. Secure communication. High efficiency.”
“Magnet Admin Bot: Your personal and effective assistant in Telegram”
Table of contents
- 🌐 General info: what the bot is and why you need it
- Quick start (step-by-step flow)
- ⚙️ Turbo setup — instant configuration of the group’s basic parameters
- Join checks screen (common)
- 🛡 Moderation — removing links, reposts, spam, banned words, and system messages
- 🎉 MC/Host — an entertainment bot with a soul
- 🌙 Sleep mode — block messages at specified times
- 📝 Post creation — instant or scheduled posts in the group
- 🏆 Rating — award points for activity and show top members
- 📲 Events channel — notifications about events from your groups, in a separate channel
- 🤖 AI assistant — smart replies and automated help for members
- Change language
- Help
🌐 General info: what the bot is and why you need it
Magnet Admin Bot is a Telegram bot for managing chats and communities.
It helps you:
• keep the group tidy (anti-spam, anti-flood, moderation);
• automate routine admin tasks;
• control how new members join (captcha, rules, requirements);
• increase community engagement (welcomes, recurring messages, posting, giveaways, ratings);
• get transparency and control (chat stats, ratings, events channel).
In short, the bot takes over “on-duty” moderator/admin functions so you can focus on growing the community and the content.
Quick start (step-by-step flow)
- Tap
/startand choose a language. - Read the welcome message and the list of features.
- If needed, confirm subscription/access (if enabled).
- Open the main menu and go to “My groups”.
- Tap “Add group” and add the bot to your Telegram group.
- Grant the bot admin permissions.
- In the bot, select the group’s time zone (important for schedules and sleep mode).
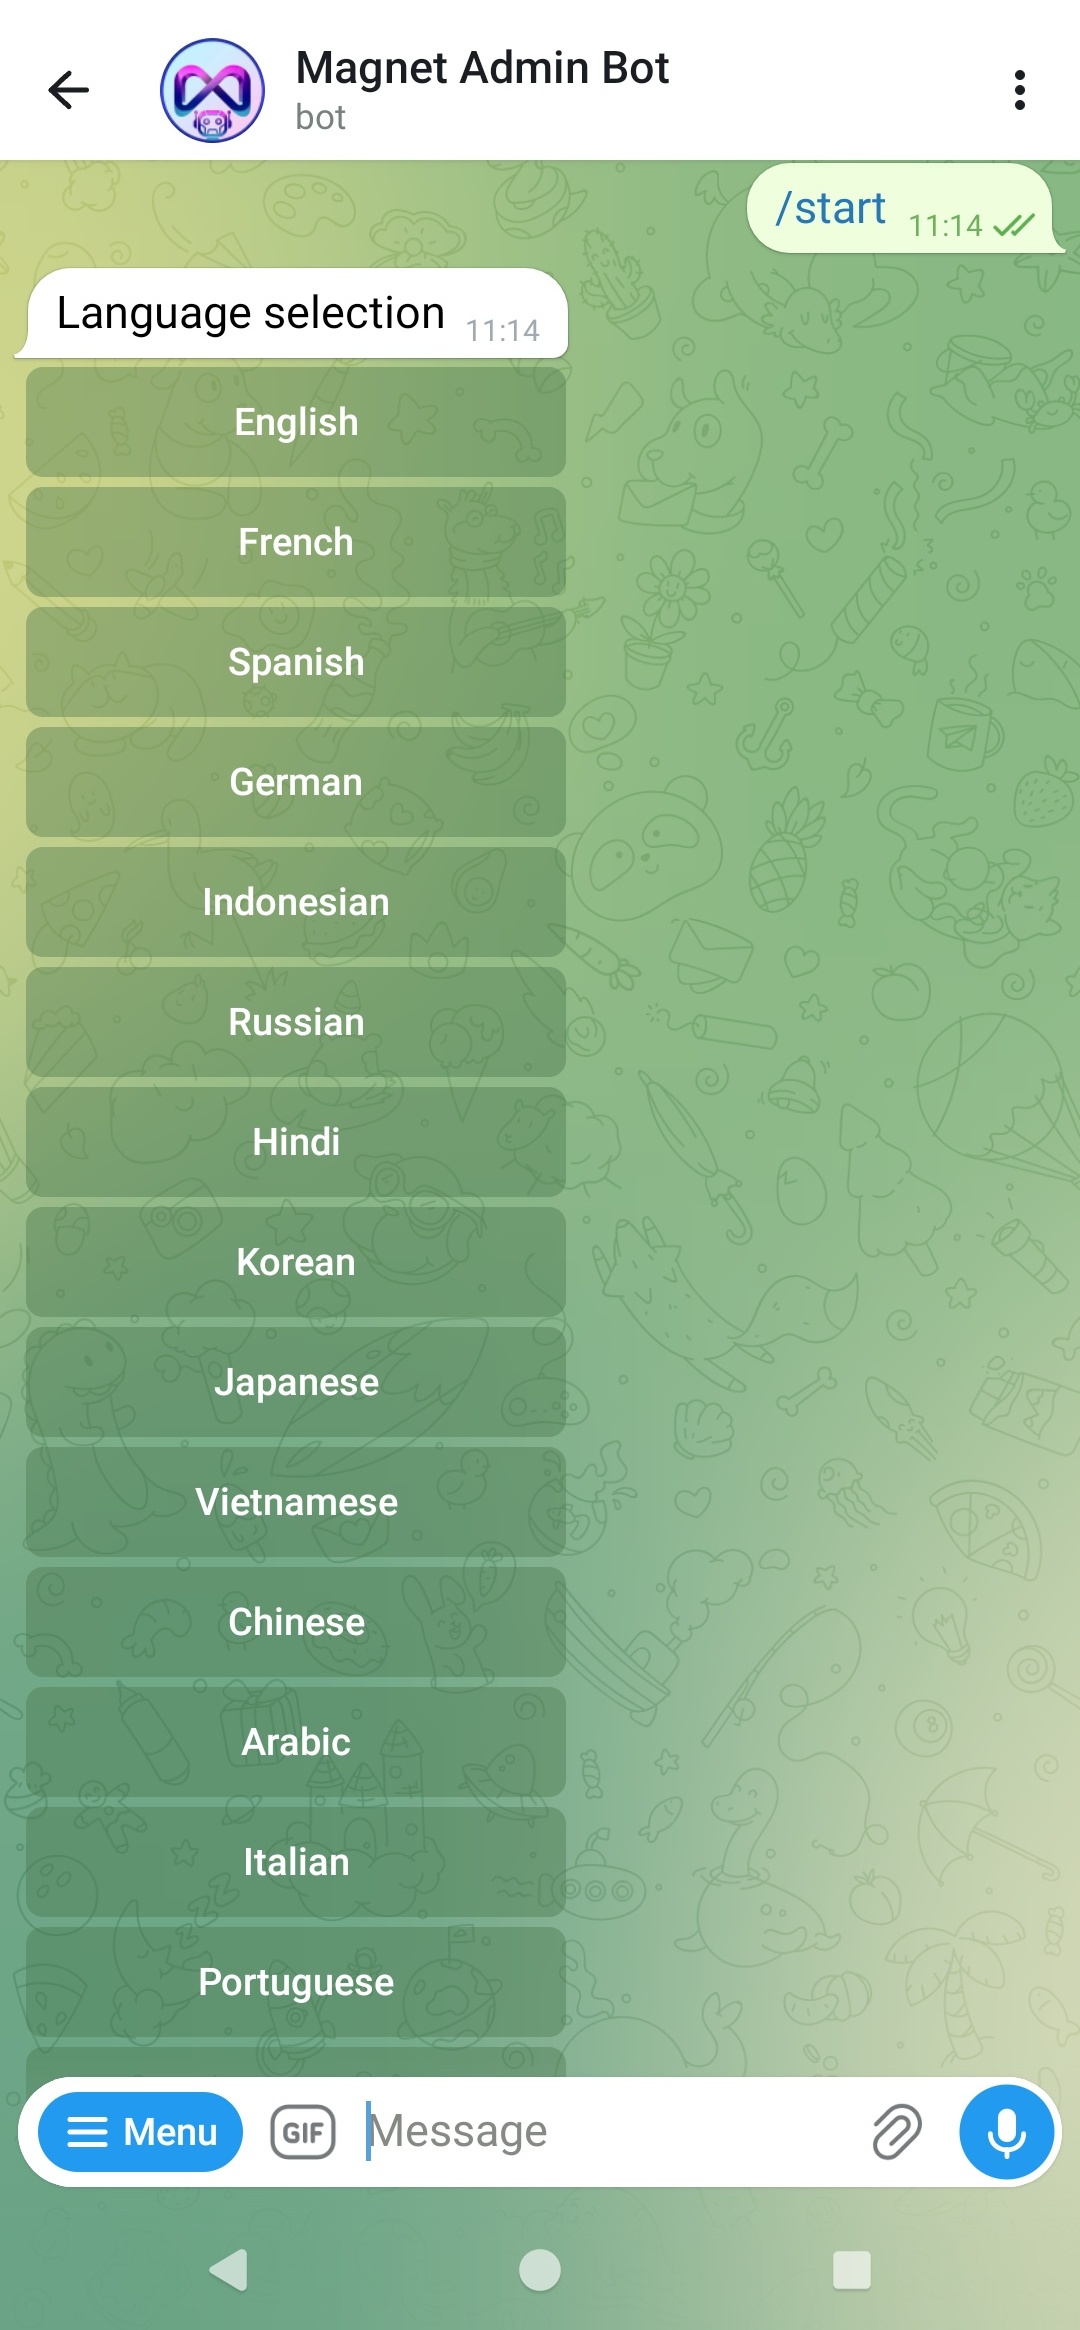 Step 1. Choose a language.
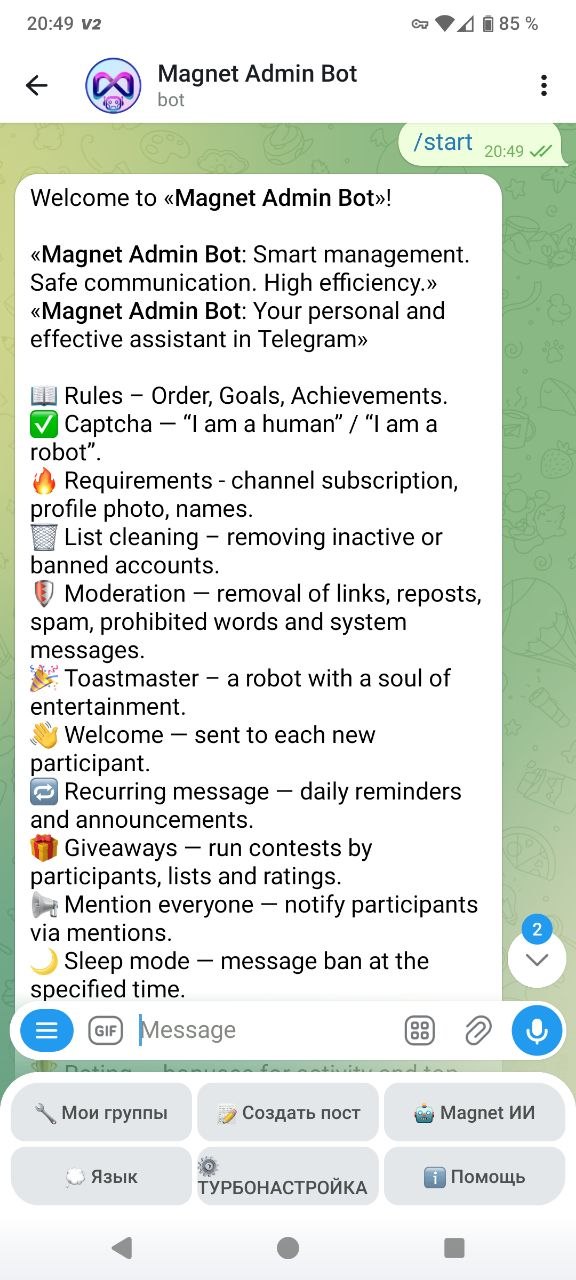 Step 2. Welcome message and bot features.
 Step 3. Access/subscription check
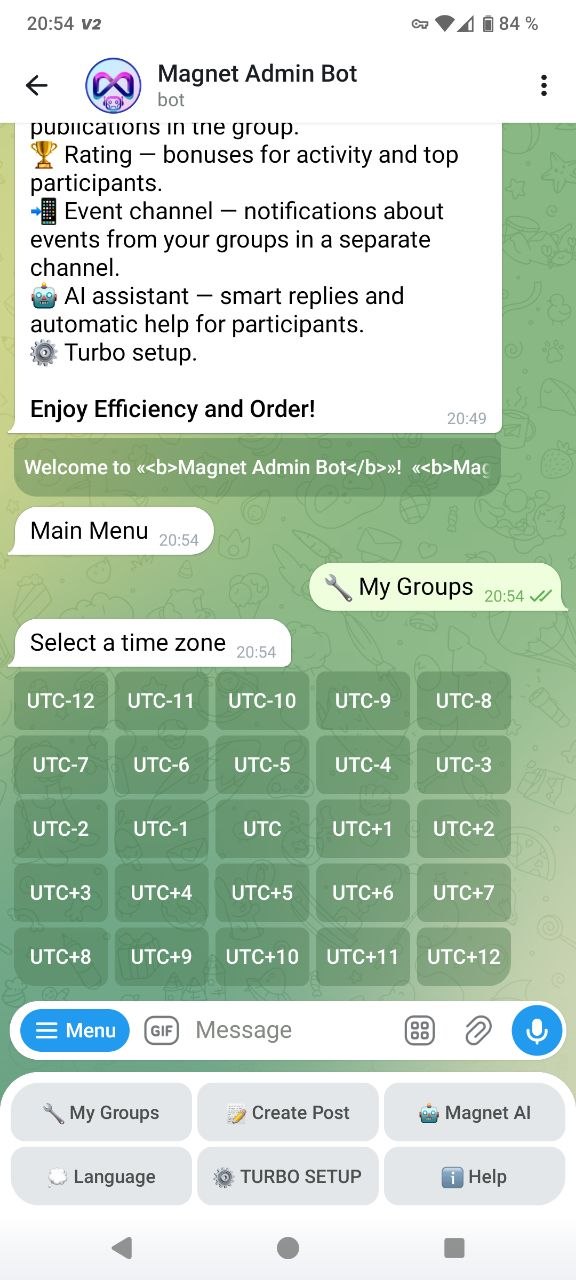 Step 4. Bot main menu.
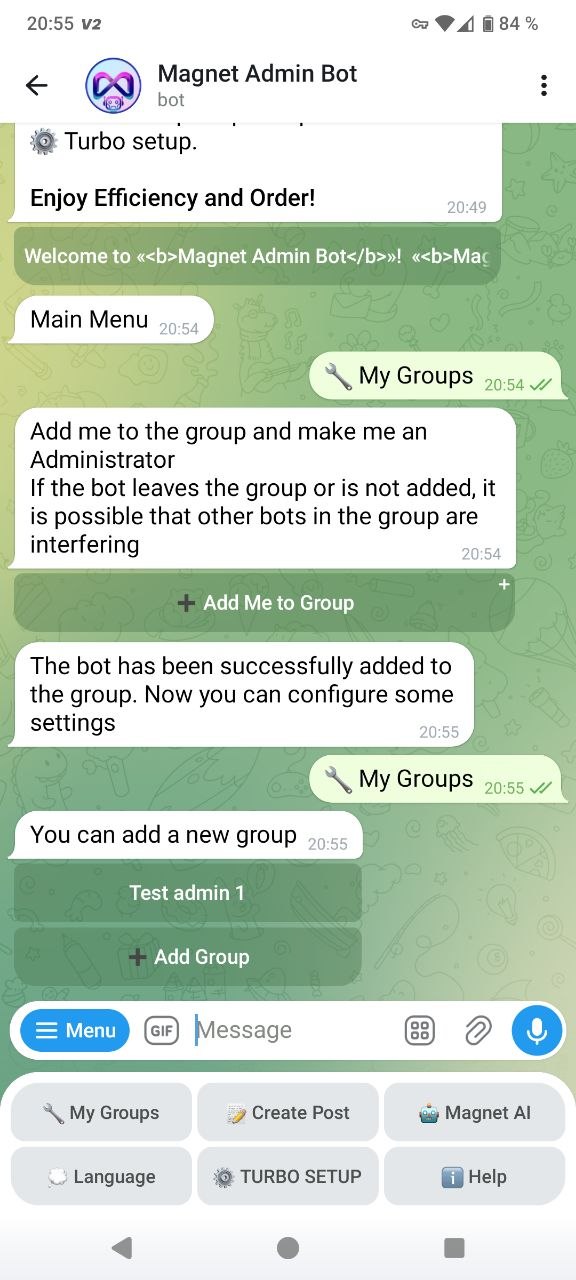 Step 5. “My groups” → “Add group”.
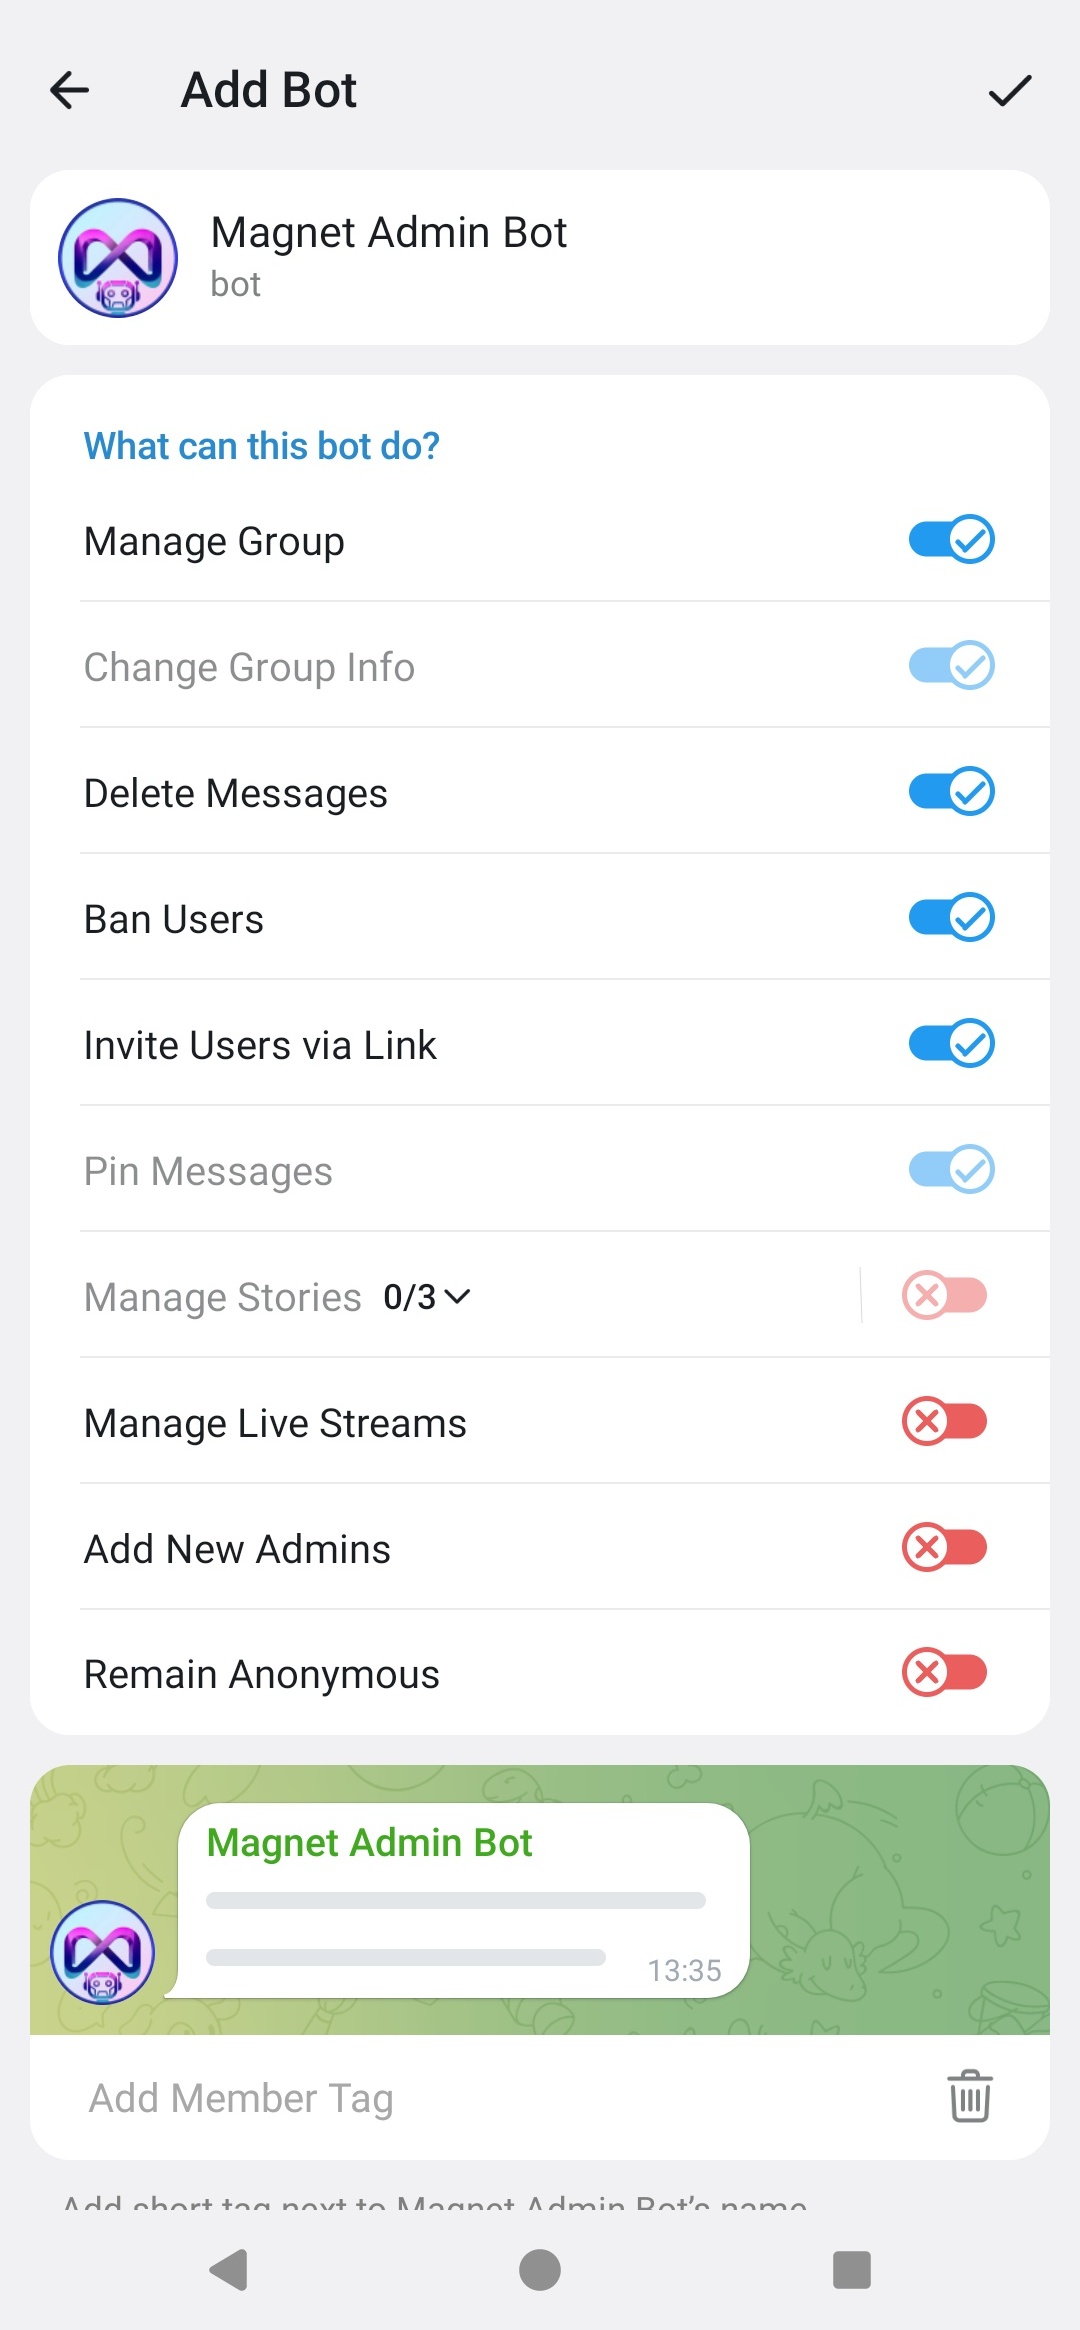 Step 6. Grant admin permissions to the bot in the group.
Step 7. Select the group’s time zone (UTC…) so the bot works at the correct time for you.
Step 8. Congratulations! You added your first group! Now you will see the list of connected groups in this section.
For further settings, just select your group in the “My groups” section and you will see a menu with all settings and features:
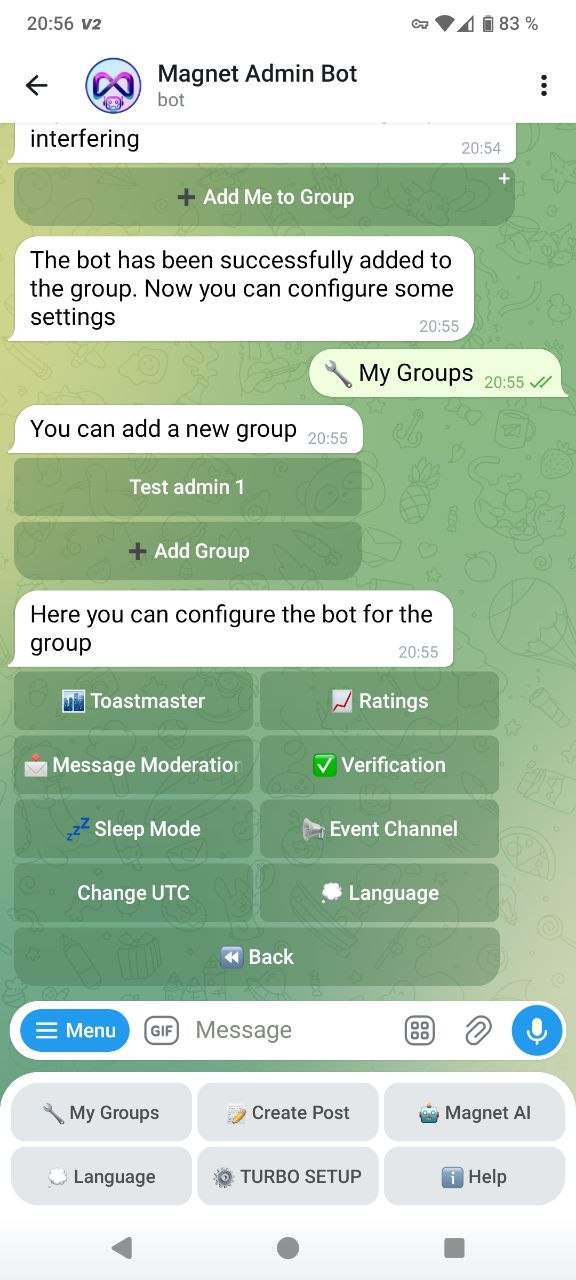
⚙️ Turbo setup — instant configuration of the group’s basic parameters
Turbo setup is a quick way to enable basic protections and settings for a group with one tap: anti-spam/anti-flood/join checks and choose a penalty (for example, mute or ban).
How to enable:
Open the bot → select “Turbo setup”.
Select the required group.
Wait for the “Done!” status.
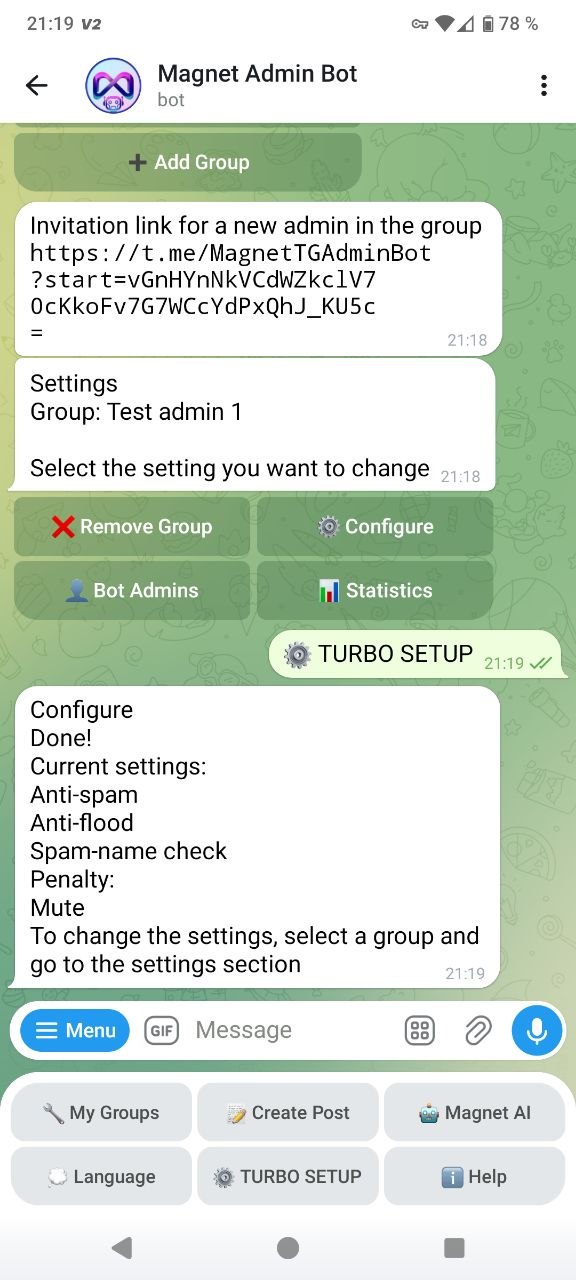 Turbo setup: “Done!” status and the list of enabled options.
Join checks screen (common)
Several features are configured via the common “Join check” screen (Rules / Requirements / Captcha / Cleanup) and by selecting the penalty (restrict sending messages or ban).
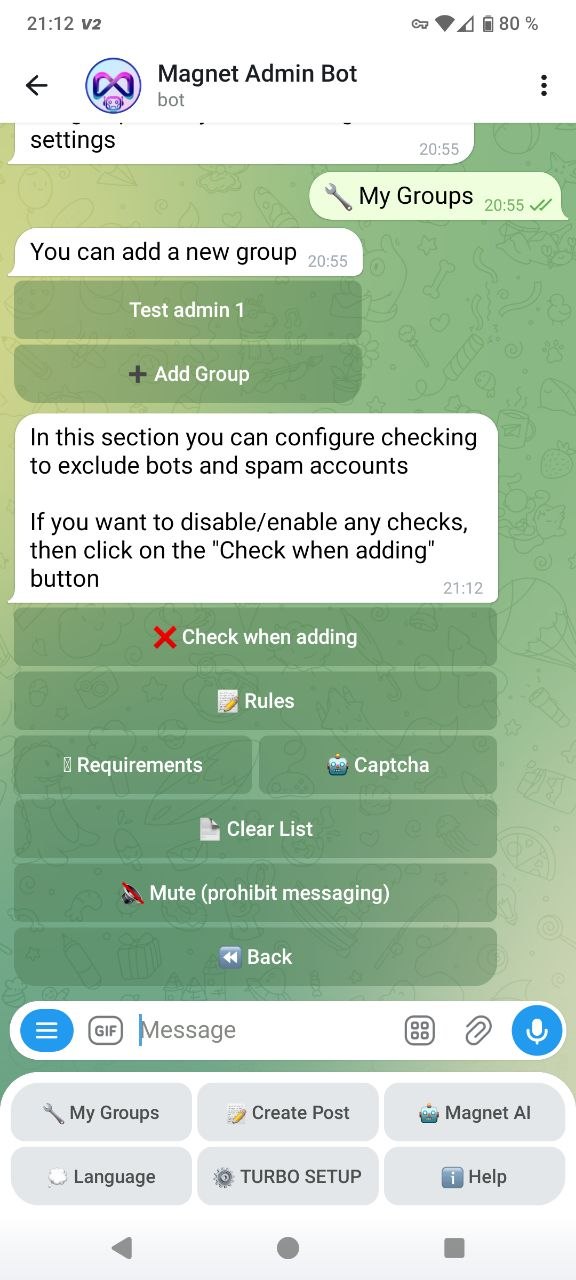 “Join check” screen: quick access to Rules/Requirements/Captcha/Cleanup + penalty selection.
Just choose the function you need and tap the corresponding button to configure it.
📖 Rules — order, goals, achievements
The “Rules” feature lets you create a rules message as a separate post: you add text and (if needed) a button, then save it.
How to enable:
Open “My groups” → select your group → “Configure”.
Open “Checks” → “Rules”.
Tap “Join check” → “Rules”.
Tap “Add text” and send your rules.
Optionally add a button (e.g., a link to a channel/FAQ).
Tap “Post preview” → “Save rule”.
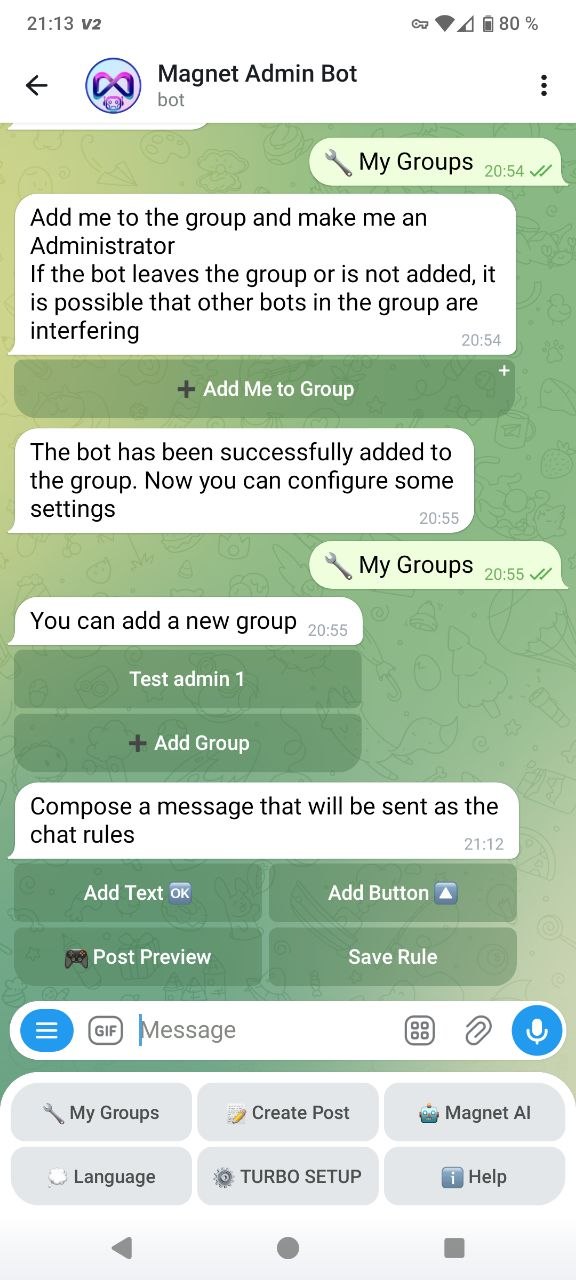 Rules builder: add text/button → preview → save rule.
✅ Captcha — “I’m human” / “I’m a bot”
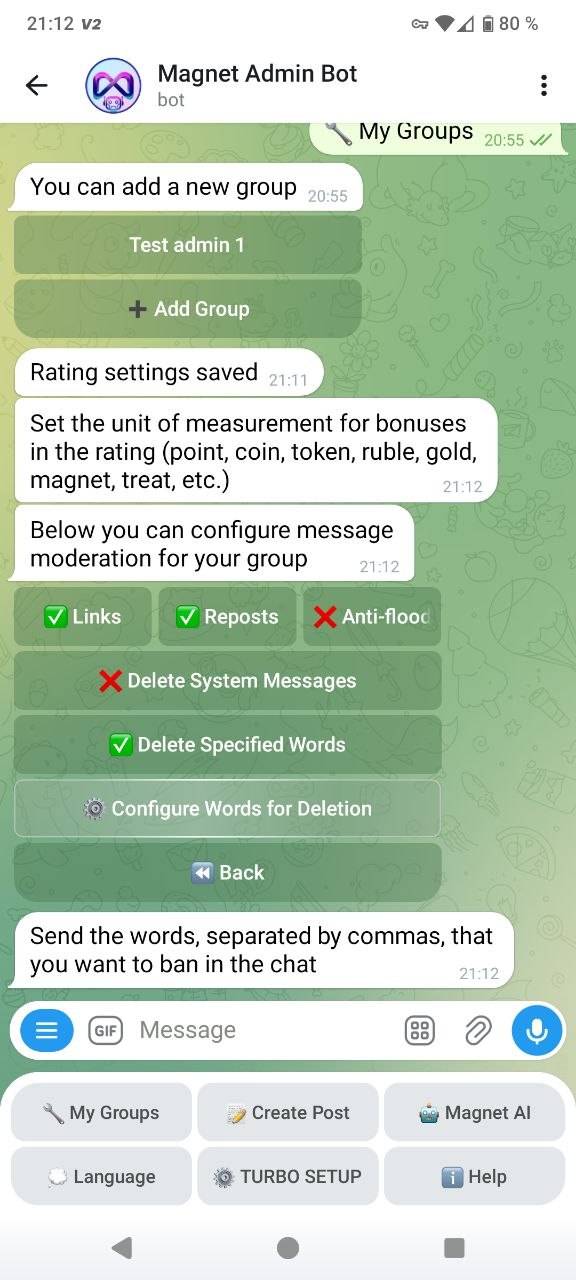
Captcha protects your chat from spam bots: a new member must pass the check, otherwise the selected penalty is applied (e.g., mute/kick/ban).
How to enable:
Open “Join check” → “Captcha”.
Enter the captcha text and sending mode (default).
🔥 Requirements — channel subscription, profile photo, names
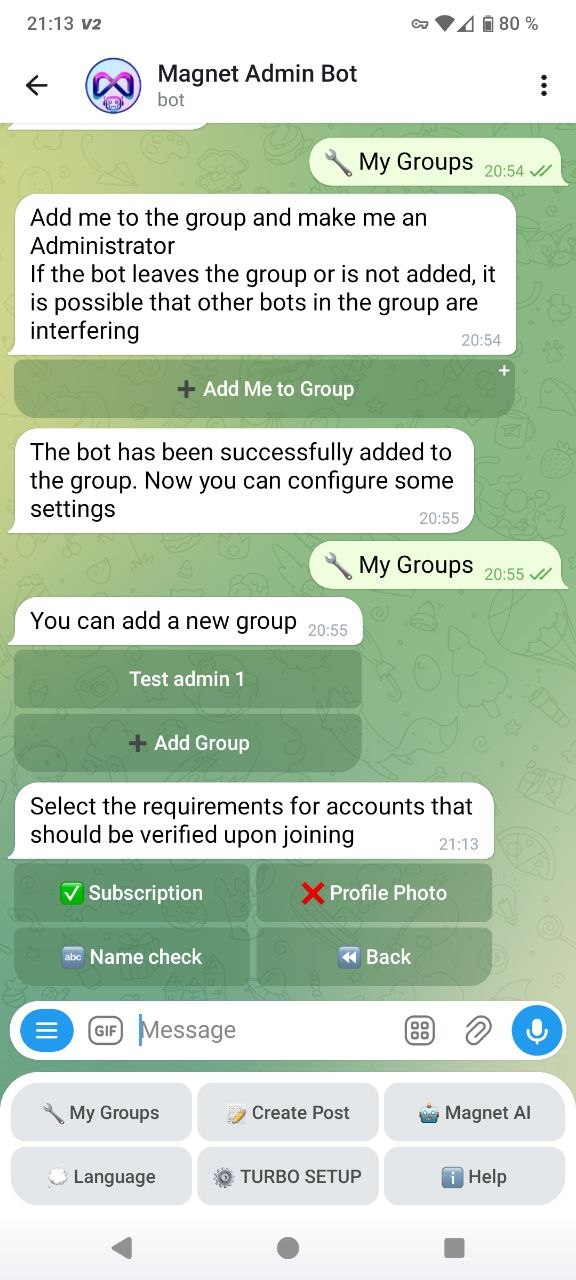
Requirements are automatic checks for new members: channel subscription, profile photo, correct name, etc.
 How to enable:
Open “Checks” → “Requirements”.
Enable the checks you need (subscription/photo/name).
 Menu for adding channels that a user must subscribe to
 Menu for selecting blocked spam names that you don’t want to allow into your chat
🗑 List cleanup — removing inactive or banned accounts
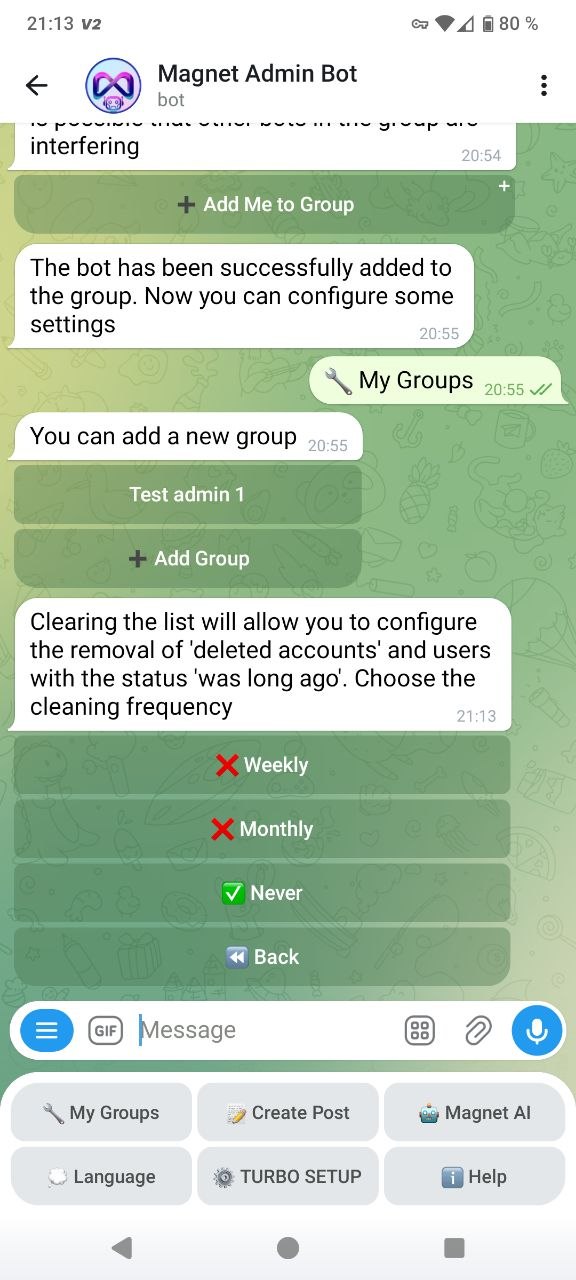
List cleanup helps remove deleted accounts and/or inactive members to keep your group tidy and the audience quality high.
How to enable:
Open “Checks” → “List cleanup”.
Choose cleanup intervals and confirm start.
🛡 Moderation — removing links, reposts, spam, banned words, and system messages
Moderation automatically removes unwanted content: links, reposts, flood, system messages, and words from the banned list.
How to enable:
Open “Message moderation”.
Enable the required filters with toggles (links/reposts/anti-flood/system messages).
For “word removal”, tap “Configure words to remove” and send the words separated by commas.
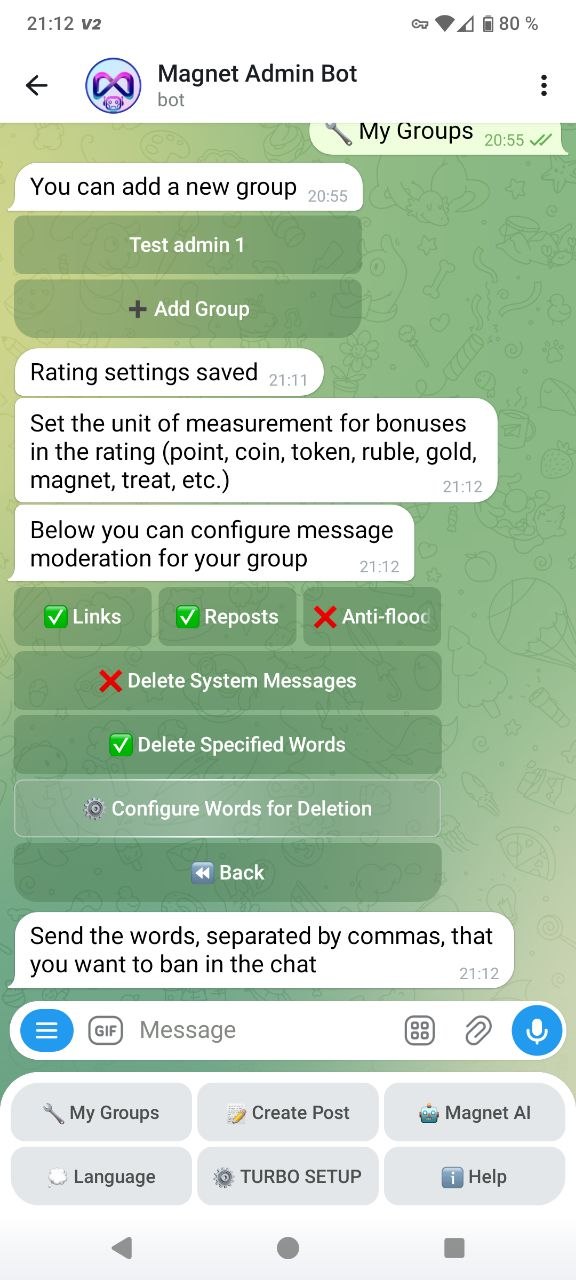 Moderation: enable filters and configure words for removal.
🎉 MC/Host — an entertainment bot with a soul
The Host section is the bot’s “entertainment hub”: it includes tools for welcome messages, recurring messages, giveaways, and mentions.
How to enable:
Open “Host”.
Select the tool you need (Welcome / Recurring / Giveaways / Mention everyone).
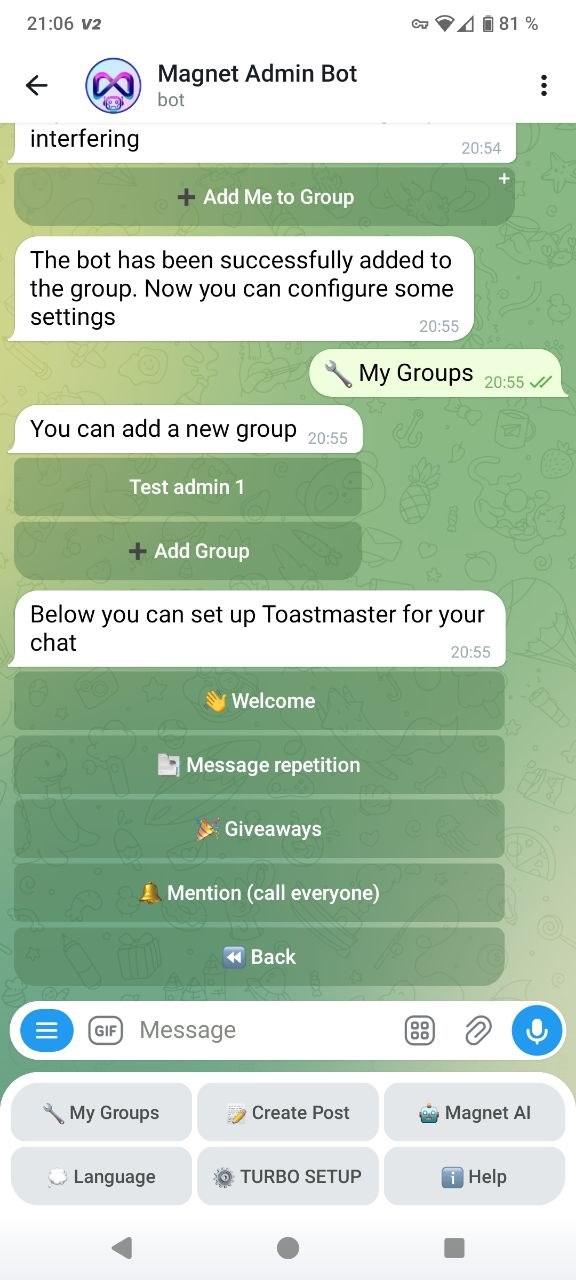 “Host” menu: quick access to the main tools.
👋 Welcome message — sent to every new member
The welcome message is sent automatically to every new member. You can assemble it like a “post”: text, media, button, voice message.
How to enable:
Open “Host” → “Welcome message”.
Add text/media/button (optional).
Tap “Post preview” → “Save message”.
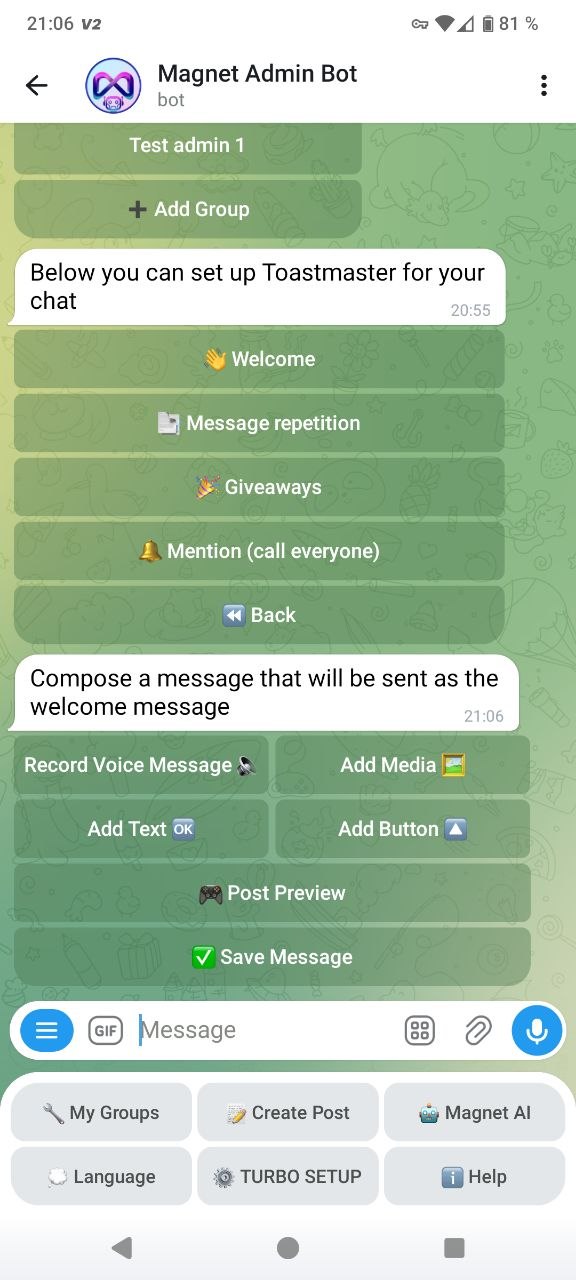 Welcome builder: assemble message → preview → save.
🔁 Recurring message — daily reminders and announcements
Recurring message is for regular announcements/reminders on a schedule (daily/by days/at a specific time).
How to enable:
Open “Host” → “Recurring messages”.
Add text and schedule.
Make sure the correct group time zone is selected.
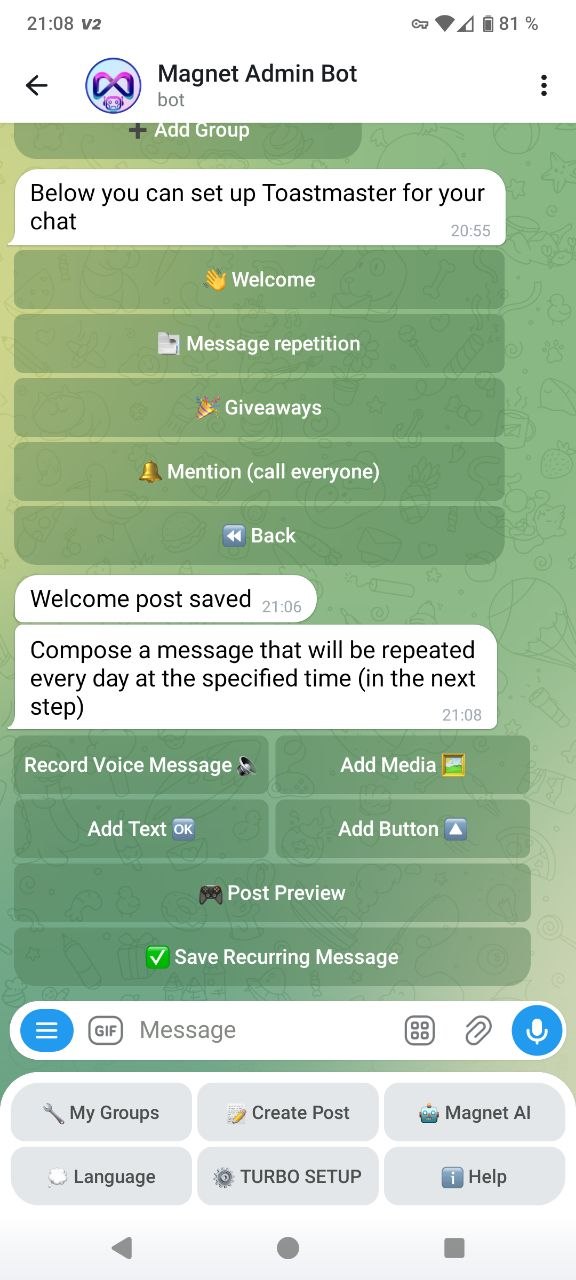 Create a recurring message
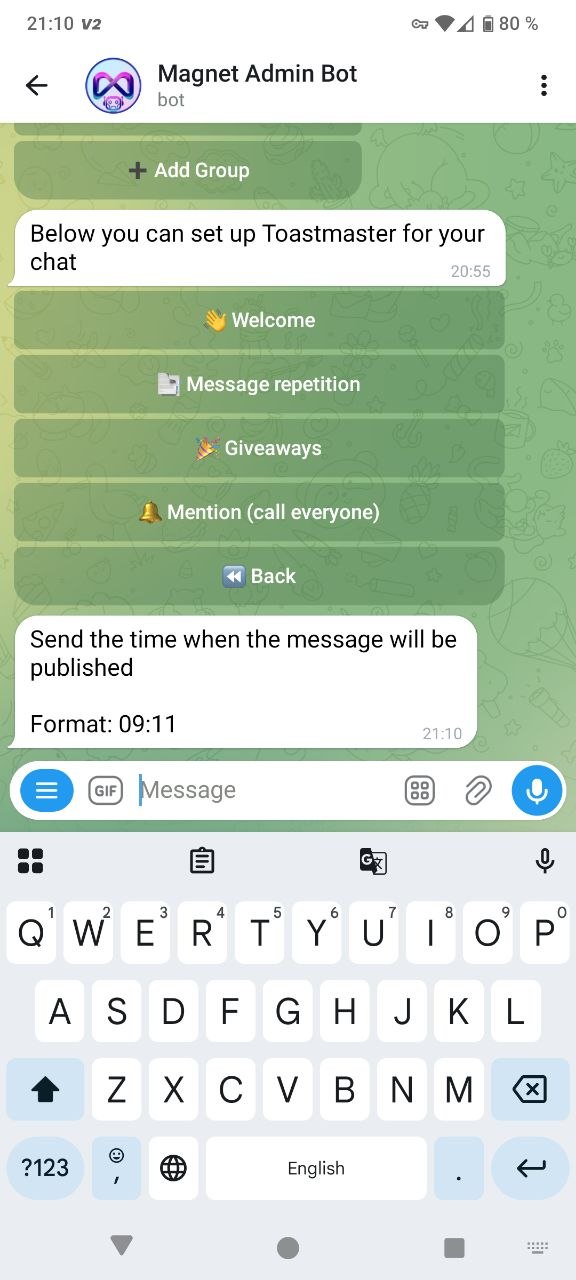 Configure publishing time
🎁 Giveaways — run contests by members, lists, and ratings
Giveaways let you pick winners using different scenarios: by numbers, by your own list, or by rating.
How to enable:
Open “Host” → “Giveaways”.
Choose the type: “By numbers” / “My list” / “By rating”.
Follow the bot prompts until you get the result.
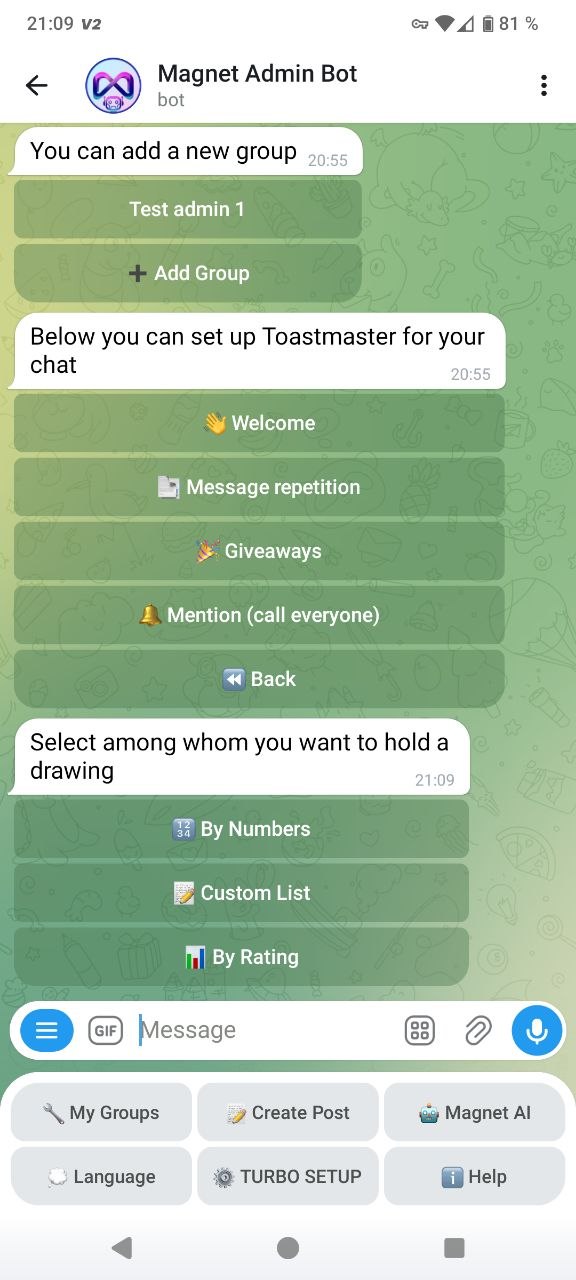 Choose giveaway type.
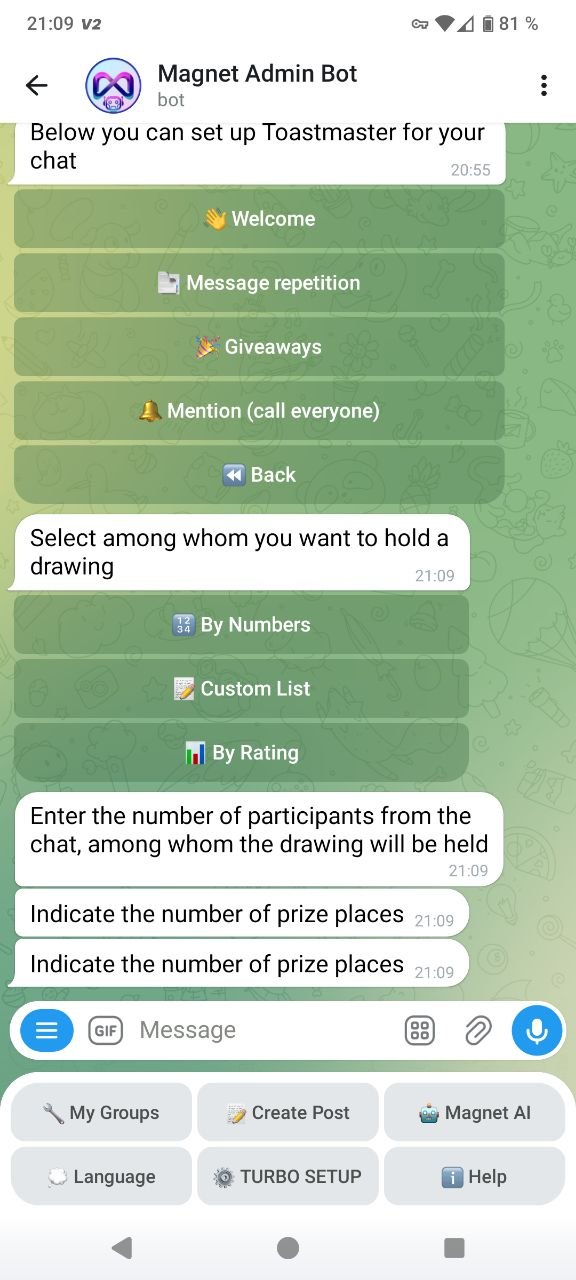 Enter the number of giveaway participants and the number of prize places
📢 Mention everyone — notify members via mentions
This feature lets you notify members via mentions. Use it for important announcements to avoid spamming your audience.
How to enable:
Open “Host” → “Mention everyone”.
Compose the message and start the mention broadcast.
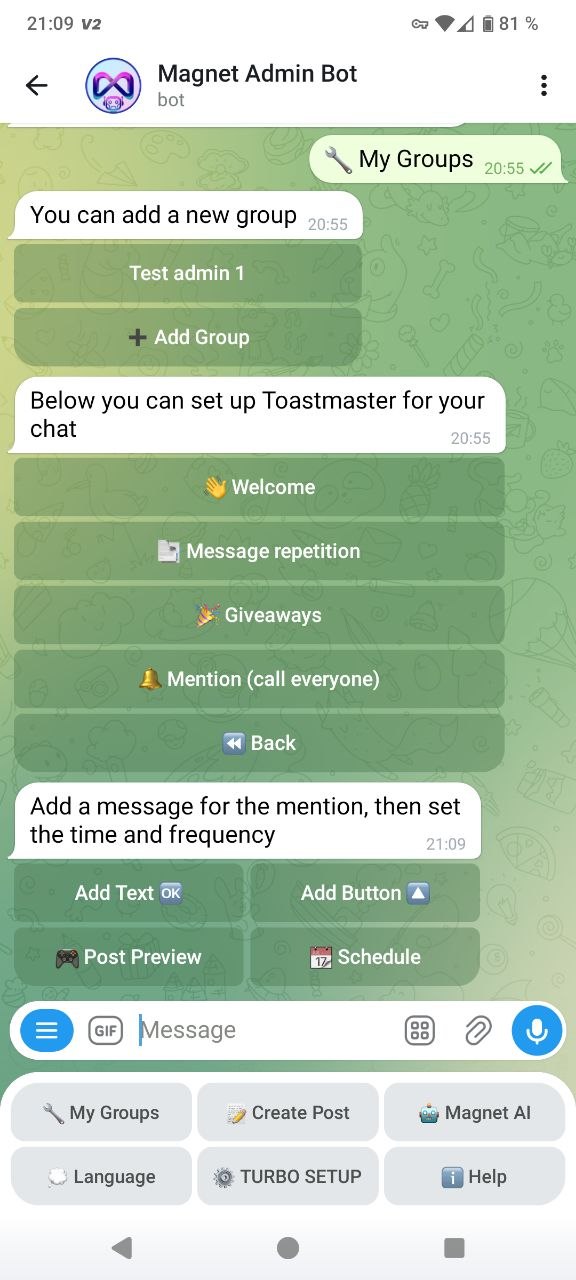
🌙 Sleep mode — block messages at specified times
Sleep mode restricts sending messages during the specified hours. Useful for night mode or “quiet hours”.
How to enable:
Open “Sleep mode”.
Choose the start time.
Choose the end time.
Check the group time zone.
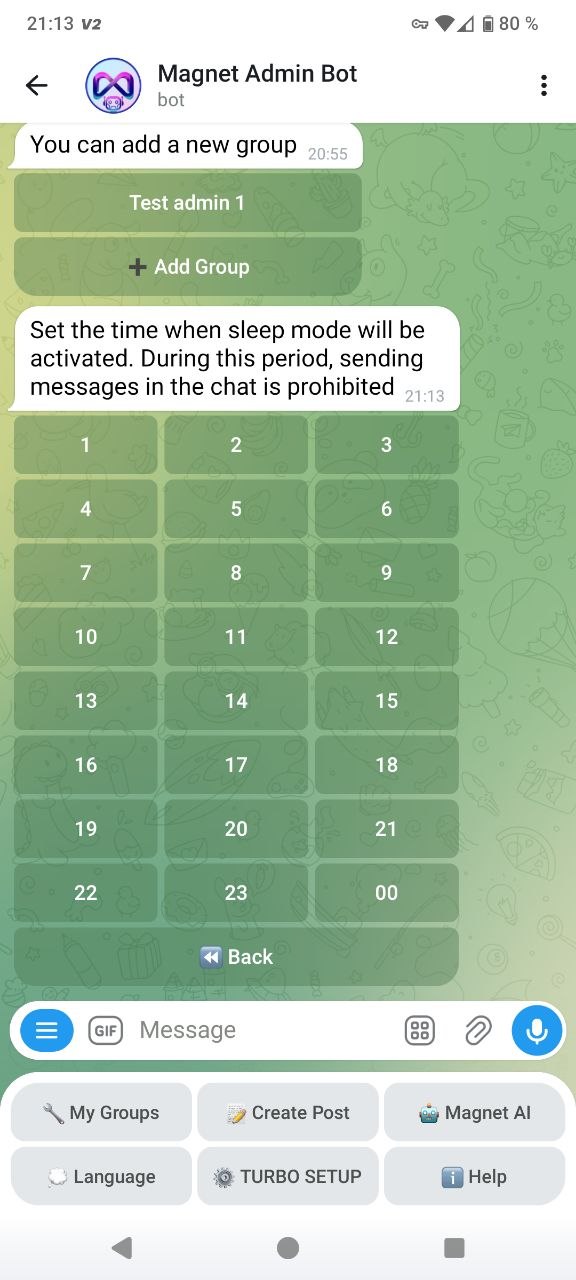 Choose sleep mode start time.
 Choose sleep mode end time.
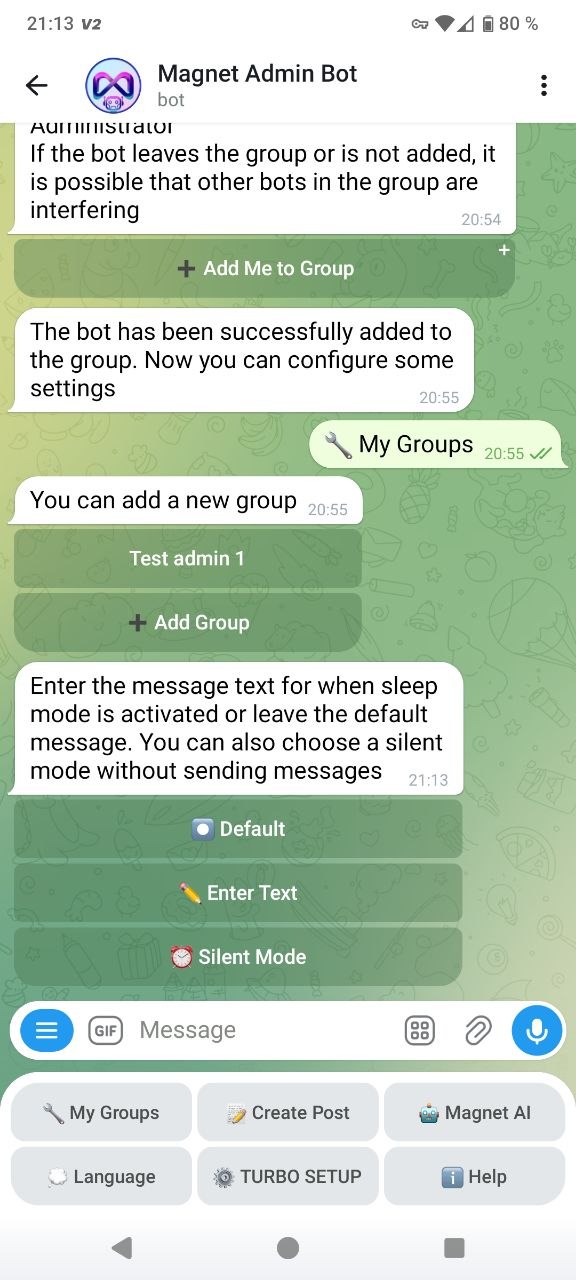 Enter text and configure the mode.
📝 Post creation — instant or scheduled posts in the group
Post creation is a post builder: you can add text, media, a button, a voice message, preview it, and then choose a group. “Pin” and “Silent posting” are also available.
How to enable:
Tap “Create post” in the main menu.
Assemble the post (text/media/button/voice).
Tap “Post preview” → “Next” → choose a group.
Optionally enable “Pin” and/or “Silent posting”.
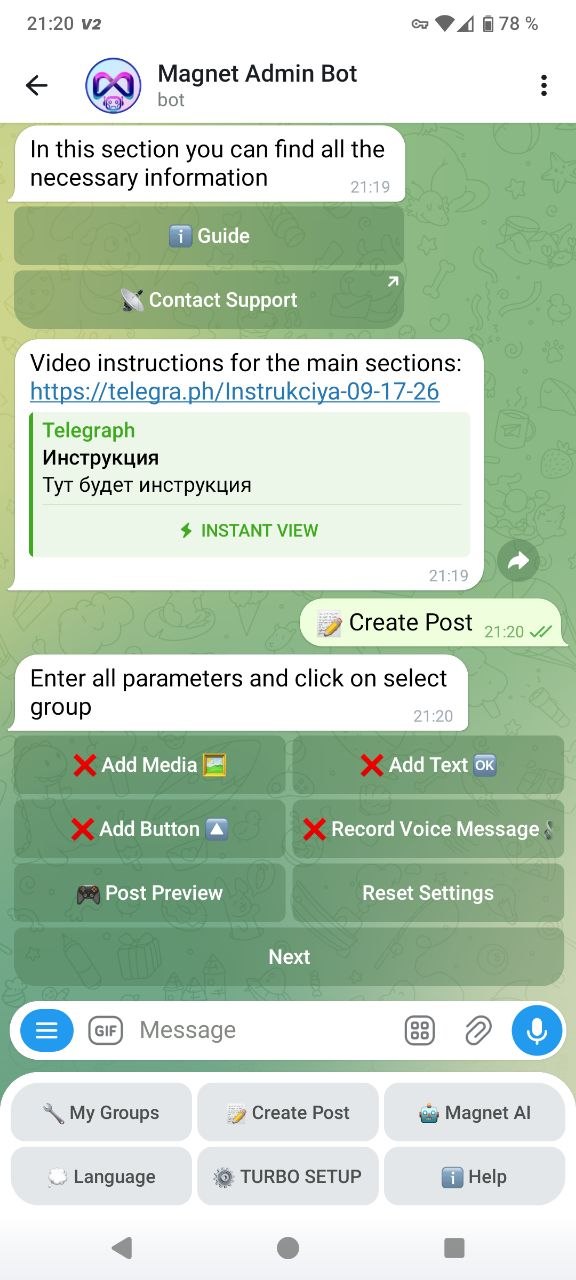 Post builder.
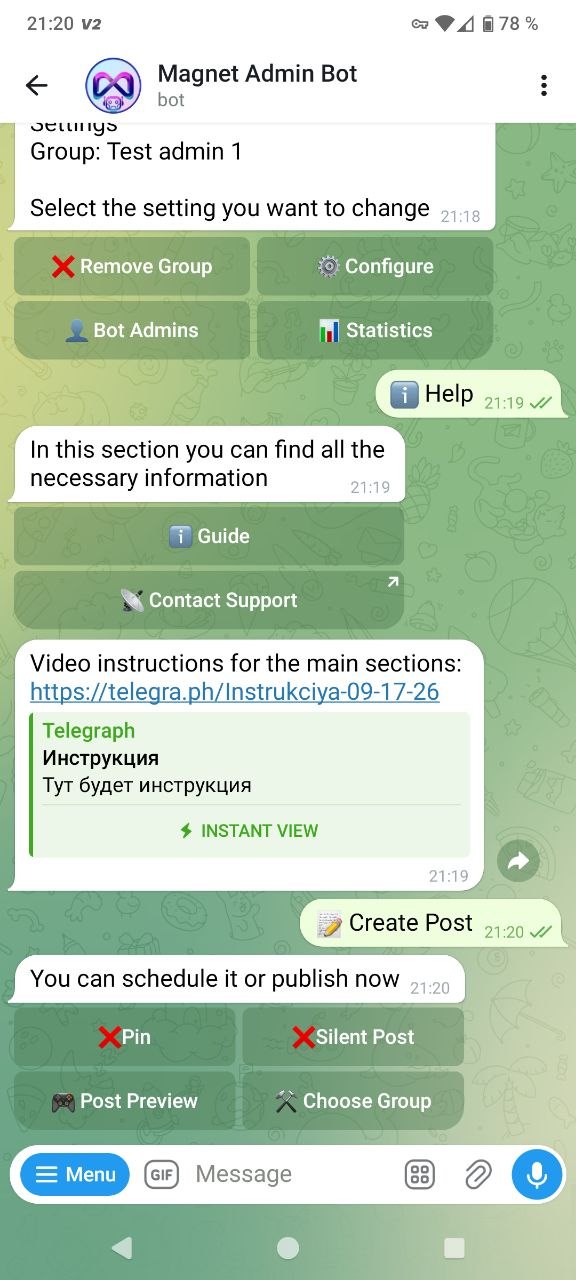 Publishing options: “Pin” and “Silent posting” + group selection.
🏆 Rating — award points for activity and show top members
Rating motivates members to be active: it builds a leaderboard and stats.
How to enable:
Open “My groups”.
Select a group.
Tap “Rating”.
Set the unit for points.
Enter the daily limit for points accrual.
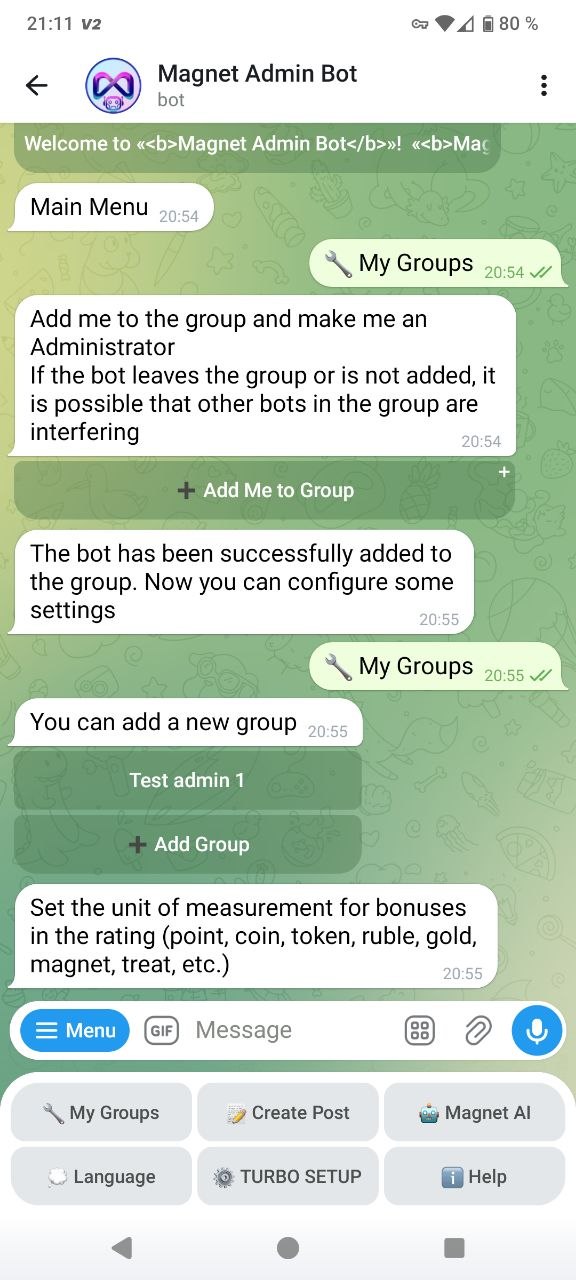

On the “My groups” screen you can see quick buttons to view rating stats by members: “Overall chat” and “Rating”.
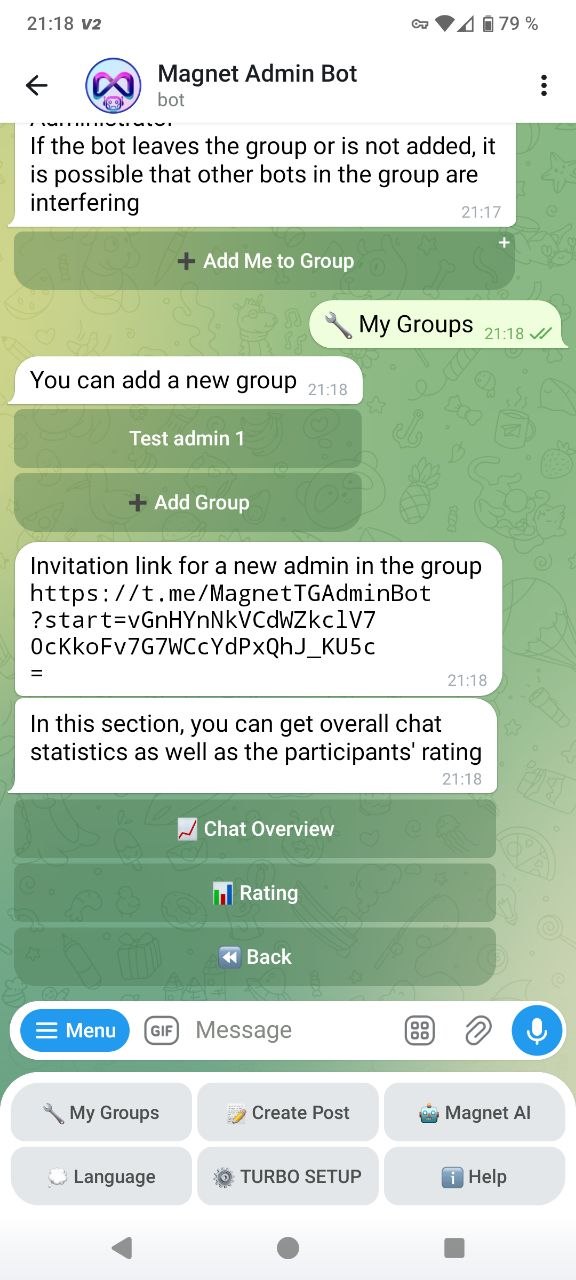 “My groups” screen: access to stats and rating.
📲 Events channel — notifications about events from your groups, in a separate channel
Events channel is a separate channel for logs and notifications (joins, bans, moderation triggers, etc.).
How to enable:
Create a separate Telegram channel for events.
Add Magnet Admin Bot to that channel as an admin.
Go to “My groups” → “Settings” → “Events channel”.
Forward any message from that channel to the bot chat — the bot will save the channel as the “events channel”.
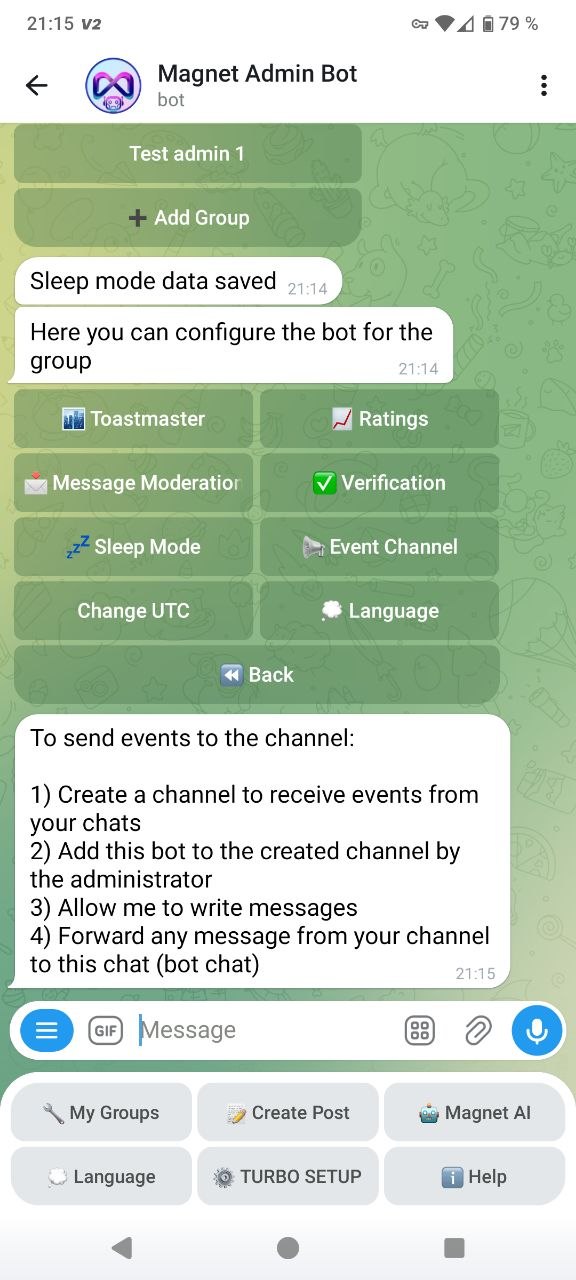 How to connect an events channel.
🤖 AI assistant — smart replies and automated help for members
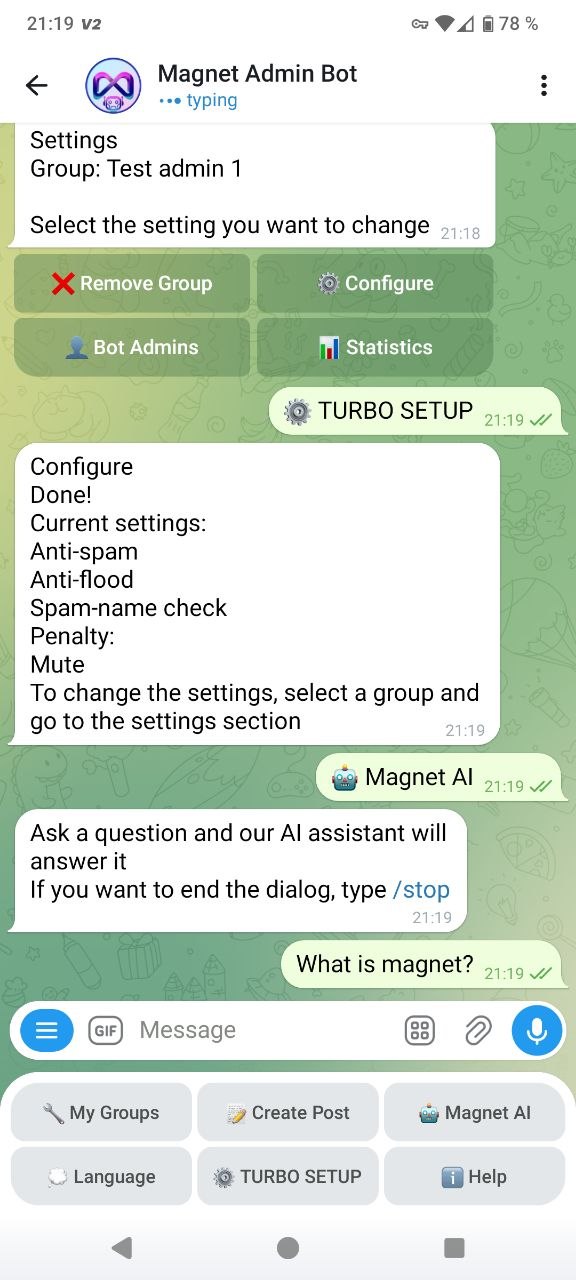
AI assistant is a smart bot that answers questions about the Magnet ecosystem and helps members.
If a request is already being processed, the bot will ask you to wait for an answer.
How to enable:
Open “Magnet AI” in the main menu.
Ask a question in a single message and wait for the response.
Change language
If you want to change the bot menu language, tap “Language” and choose the language you want to set as the main one.
 Language switch section
Help
This section is for learning instructions and contacting Magnet support.
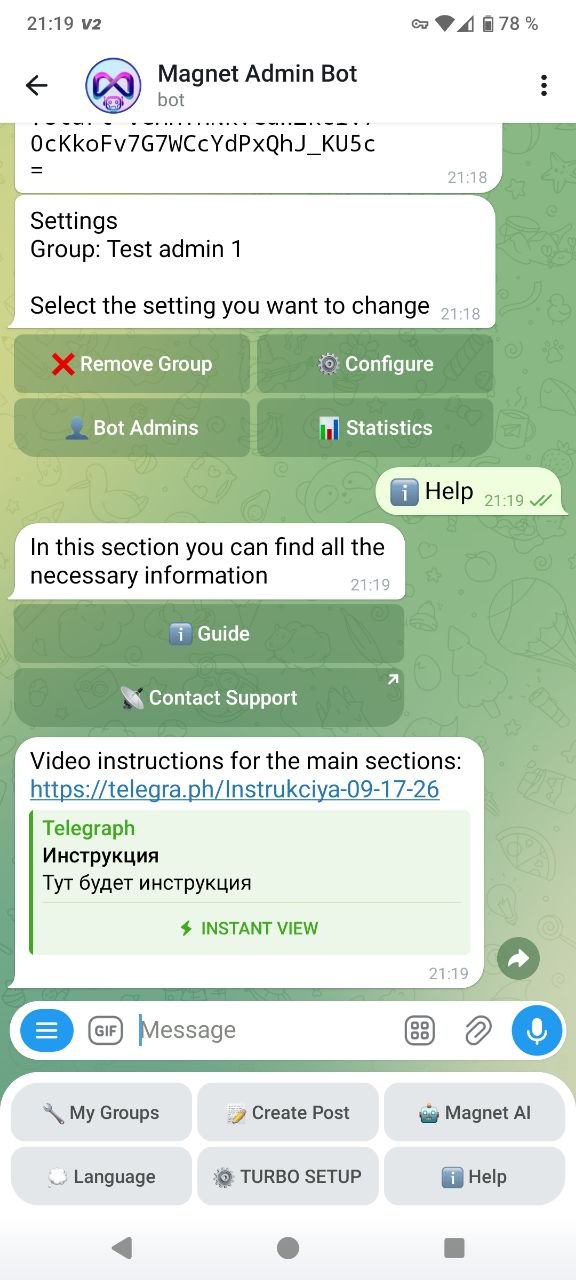 “Help” section